![]()
Joomla tutorials
Find & Get reliable Joomla expert opinions you can count on
How to install Bow Themes Template quickstart pack?
- Details
BT Arise Corporate template has been released but that's just the first. In the future, we will launch other templates and this tutorial will help you install all Bow Themes templates quickly as possible. Very simple, just a few minutes and you've got a perfect site. Let's start now
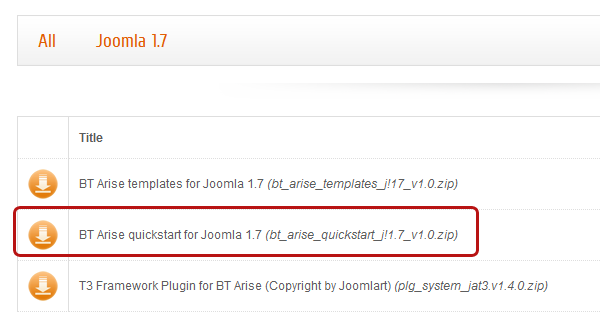
Step 1: Download Bow Themes template Package
Download quickstart package from bowthemes.com. Please make sure you download correct package for your sJoomla version you want to use.
Step 2
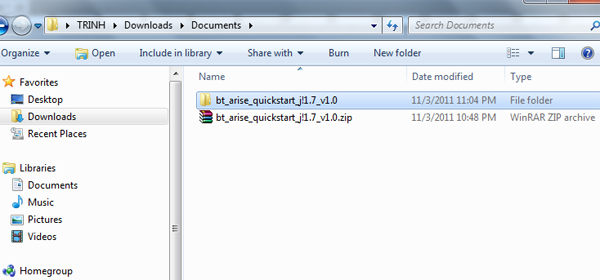
The next step is extracting the file locally identified as quickstart. After the extraction is done, it will contain within all files needed to perform this type of installation.
Step 3: Extract and upload it to your server
Upload all the files into the directory of your website, where you want to install your new Joomla! project. Depending on upload speed of your connection or from your server configuration, this process might take several minutes.
If you don't have any FTP software, we recommend FileZilla - a powerful and free FTP solution.
Step 4 : Files Installation.
Once the page opens it should look something like the image below.Select the language you want to use with your installation and press next.

The next page will give you a sense of your server compatibility. You will need to troubleshoot any of the flagged areas that are unsuitable for a Joomla installation before you continue here. Once you get the all clear ... click next again.

Install page 3 is the GNU/GPL page .. you need to agree to the terms before continuing.

Install page 4 is the database page. The details you enter here are important as this is where the actual information for your Joomla installation are going to be stored. In a nutshell you need to create a mysql database, a user for the database and then assign that user to the database you created.This step requires a slight detour and we need to open up cpanl on our server.

Step 5 : Prepare your database
Open the cpanel account on your server. Most of the time you find this by navigating to https://www.mysite.com/cpanel. Once you have logged in navigate to the database area of the cpanel account. This may look different on your server depending on the theme ... but the image below shows you what it looks like on one of our servers.

You can use the database wizard to step through the process but for those who dont have the wizard on their cpanel install this is how you create the database.
Click on the mysql database icon and write the name of the database you want to use for your site in the window provided. You can use any name you want to here. Click on the Create database button and you should receive a success message telling you that the database has been created.

Navigate back to the mysql database page and scroll down to where the Create new mysql user input boxes are.

The username and password you put in here are really up to you, but for your Joomla site security its advisable that you use the random password generator if you have it on the page.
After clicking Create New User you should receive the success message and you should then be able to navigate back to the mysql page and scroll down the page again. Take a note of the username and password - as we will need this later.
You now need to assign the user to the database. So where it says "Add user to database" select the database and the user you have just created and make sure they appear in the top and the bottom drop down boxes.
Once you have the new user and new database in the select boxes click add. The following screen should appear.

Assign full or all privileges to the user and click "make changes" submit or add user or whichever submit button you have there. You should receive another success message telling you that your user ha been added to the database. You need to pay close attention to the names they use here as the database prefix and user prefix will be needed when filling out the information in the next step. As an example the dummy database we created while doing this tutorial is called test and on our server we can access it by using bowthemes_btarise
Step 6: Database Configuration
Select MySQL type of database from drop down list and enter the hostname of the database server Joomla! will be installed on (normally it's "localhost").This may not necessarily be the same as your Web server, so check with your hosting provider if you are not sure.
Enter the MySQL username, password and database name that you previously created on your host control panel.
when ready press next.
Step 7: FTP Configuration
The next page is where you configure the ftp settings for the site. The ftp layer was brought into J1.7 as way of helping out with file permissions in some server configurations. Using it is optional and can be initiated later on when using your site. So you can either fill out the details and click next or simply click next.

Step 8 : Main information configuration

If you were to perform a normal installation of Joomla, the website name, administrator e-mail and password would be configured on this page. However, you will find these fields purposely inaccessible. Remember, that this version is prepared by Bow Themes.
So after the installation is complete, you can modify your data log without any problems.
Step 9 : End Installation
Congratulations! The installation is successfully completed. However, before you enjoy your new website, you must delete "installation" directory by Click to button "remove installation folder" or rename/delete it via FTP
After performing this step, click "Site" button to visit the homepage of your website. You will find the new website fully operational and looking exactly like our demo.

Once you have done that you should successfully be able to navigate to the front end of your site and see the template set up exactly the same way as the demo site.
You are now free to edit, change and add to the site to personalise it and start to market your Joomla web presence. Good Luck.
I hope this has been helpful to you. Feel free to provide any constructive feedback you may have. I will upload video tutorial soon
Bow Themes